Showing posts with label sewing. Show all posts

Saturday, December 4, 2010

Salsa Skirt Information


When I said this was an easy skirt, I realized afterward that 'easy' is a relative term. So, please let me just share a bit about the skirt details, so you can determine for yourself if you think this is an 'easy' pattern to sew up for you.

First I must say, this pattern was designed for 'slinky knit fabric. Usually this type of knit is sold in large widths. Slinky knit has a great drape to it and good quality slinky knit is expensive. In my picture here, you can see the slinky knit skirts I have made. In this collage I have made two slinky knit skirts. The black and print fabric skirt, alternating the panels solid/print, is made from two different slinky fabrics. The navy blue green skirt is also a slinky fabric. The other two skirts, one is made form wool and the other is made from linen. Because the fabric is designed for knit, I used a size up for my woven fabric skirts. I have made 6 of these skirts so far, three in slinky knit and three in woven fabrics. With two of the woven fabric skirts, I have put a zipper in one of the seams. With going up a size in the pattern, it's not really necessary. This last one I made out of wool, I did not put a zipper in it. I did add about 2" to the length of the skirt, which is very easy to do, just like taking a couple of inches off is pretty easy to do as well.

There is only one pattern piece. It is a spiral shape. You must cut all of the pieces, facing up. In other words, you do not put 'right sides together' or fold the fabric so you can cut two pieces out at the same time. However, you can stack your pieces, cutting all 6 panels out at once. You cut a section of fabric out that will be large enough to fit the spiral shape onto it. Cut six pieces of the same size out. Stack them altogether, pin on your traced out pattern piece and cut them all out at once. Because of the curve of the spiral piece, you use only a 3/8" seam allowance. You are sewing an inward curve with and outward curve, which can be a bit tricky, if you haven't ever done that before. Once you have done it, it's easy. Because you only have a 3/8" seam allowance, you want to have a way to finish off your seams. I have a serger and serge my seam, after I have sewn the seam together with my conventional machine. If you do not have a serger, you can zig zag your seams allowance together, you can bind them together with some bias tape. If you are using knit, you do not have to do that as the knit will not unravel on you. It's the woven pieces you want to finish off. I do finish off my knit with a serger, but I don't have to.

As is, the pattern has an elastic waist, but if you want to tailor it more, you can eliminate that and put the zipper in the seam. This pattern has flexibility to it. You can play with it and have fun. Use two different fabrics or three different ones. If you want more volume, add another panel or two, but then I would drop down a size or two, depending on how many more panels you wanted to add.

Once you have made this skirt you will want to make more. It has a wonderful 'kick' to it when you walk. :)

Enjoy,

Carol

Saturday, July 11, 2009

Bridal Apron


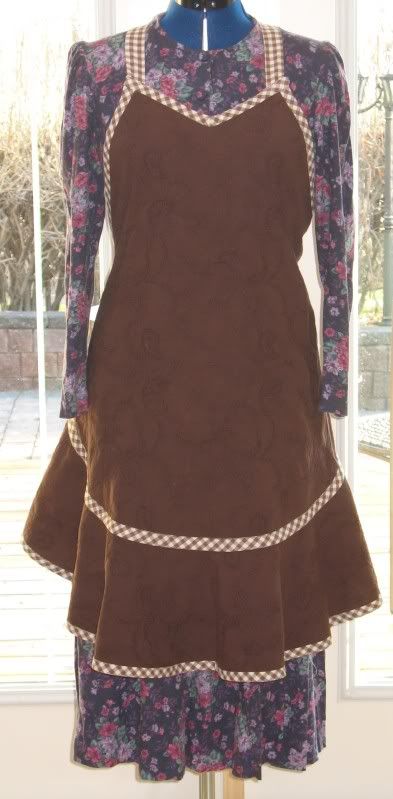
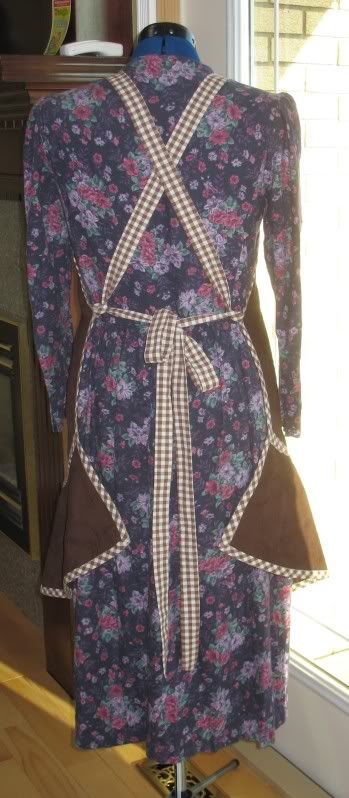
Here's the apron, that started my thinking on a bridal shower gift. Working with Emilie's colours, I found the perfect embroidered, cotton fabric, that was of the right weight for an apron. I found the lovely cotton gingham fabric to use for the bias tape features. The pattern I chose to use was Butterick 4945, using view D. Of course I had to make my own modifications to this. All of these lovely items were in my 'stash', for the right project, for the right time.

Changes I made to the apron were:

-I added 3" to the length, but I did that at about the waist line, not at the hemline.

-I did not go for a smaller size, as I like to have good coverage when working. I decided to use the size Large, to make sure there was good coverage, for when and if the Lord blesses Emilie with a child. It's nice to have an apron you can wear in your pregnancy, that doesn't tie around the waist, and you can adjust the straps.

-I ditched the facings on the upper sides and put biased edging instead.

-I used my favorite treatment for the shoulder/waist straps. I made long straps that thread through loops I have made, using the bias tape, so that I can adjust the apron as needed, both for the shoulder area and the waist. I saw this treatment on an old apron, from around the year 1910 and have seen it in antique and vintage apron patterns. It's my favorite way to make an apron adjustable.

Emilie tried on her apron, and she looked so good in it. I wish I had snapped a picture of that one, oh well. Maybe next time.

Thursday, May 21, 2009

WIFD Day 5 It's a Wrap


Sunshine!!! We finally have some lovely sunshine, and I am grateful! For today, I am wearing one of my new wrap dresses. Like many women out there who enjoy sewing, I have a fascination for wrap clothing, but in particular, wrap dresses. I have quite the collection of vintage patterns, for wrap dresses, that continues to grow. I seem to find a new treasure, all the time. One of those special wrap dresses that I didn't even know existed. It was about a year ago, perhaps a little more than a year ago, I came across a new treasure. It is from 1954, Simplicity 4682, and it's not a tiny size, so I didn't have to scale the pattern up, YIPPEE!!!

I did have to make a few adjustments, but not too bad. I did have to modify the bustpoint, to drop it, but only a little bit. With that, I made the front bodice into a princess seam, rather than the two darts they have. The princess seam gives me a much better fit. With the shoulder straps, I reversed the way they have them. I put the bodice top portion, over the back, rather than the other way around. I like the look much better. For the bodice skirt back, I used buttonhole elastic to keep a smooth closure for underneath the front of the dress. For the ties, I made narrower ties, as I don't like the really big puffy ties. I was able to squeeze the pattern onto the fabric, so I left off the front and back seam, which always makes me happy.

The fabric that I used for this dress is a brand new, lovely, lovely cotton sateen sheet. It truly feels like butter, it's so soft. I was looking for a fitted sheet for our bed, when I saw this lovely sale of sheets that was going on at Home Outfitters. I think they were clearing out this brand, so they had all these sheets on for 60% off. So with one, twin sized sheet, costing just over $5.00 in Canadian funds, I put together this wrap dress. I had the cotton gingham in my collection, but I figured with the amount of gingham I used, it cost me about $4.00 or just under. So the dress, altogether, was under $10.00. :) I went back to the store and purchased several more sheets. One twin sheet gives me about 2.6 meters, once the fabric has been washed and it's 1.75 meters wide, EXCELLENT for the projects that need more width. I have never seen this lovely of cotton sateen before, so this was a treat for me.

I will attempt to take more pictures of the dress, on the dress form, later tonight. That way, you can see more of the details. For now, I am just enjoying wearing this fun dress. I have plans to make a linen slip that will go with this dress, and a few other 50's styles that I am planning.

Now, off to enjoy that sunshine.......

Wednesday, May 20, 2009

WIFD Day 4


Unfortunately, today was another cold day. With that in mind, I dressed for warmth, again! I put on my microfiber tights, faux suede skirt that I made years ago, along with a cotton tank and cotton sweater by Christopher Banks. It's really hard to see in these pictures, but those black things that look like x's, are golf clubs along with tees and golf balls. For my hair, I parted it down the back and then twisted the pieces, separately, then I combine them together for another bit of twisting. Then I used one of those 'bird beak' clips to hold it all in place. I like this design as it's a bit different and it only takes a minute or so to put it up.

We were suppose to go outside to play hockey, but it was canceled, due to weather, much to my delight. We had snow and rain, on and off all day. I disliked the idea of standing outside in the cold, knowing I could be home, in a warm house, sewing on my projects. I was able to finish off one of my dresses, so hopefully, if the weather is good, tomorrow, I will share my fun, new project.

Tuesday, May 19, 2009

WIFD Day 3


Today has been another cool day, but not snowy or rainy. When I checked the weather report, they said we should have temperatures up to 15 degrees C, so I thought I would trust them. I chose to wear a dress I finished making, yesterday. This one is made from a pattern by Coni Crawford, it's the Princess Sheath Dress and the fit is very good. I still needed to drop the bustpoint, by a wee bit, but overall, it went together nicely and fits very well. I changed this to be a sleeveless dress and I used bias to bound the neckline and armholes, rather than facings. I don't wear sleeveless on it's own, and I have quite the selection of sweaters I like to use as my second layer for modesty sake. The cotton sweater is by Lands' End and is a deep purple, which coordinates lovely with the variety of pink shades in the dress. The dress fabric is a cotton poly blend, with mostly cotton.

This was my 'testing' dress, as I wanted to see how close Coni's patterns actually are, to body shape. I have yet to have a pattern I have not had to alter because of my full, lower bustline. This one was close, I nearly got away without an adjustment, but in the end, I had to tweak the pattern to drop the bustpoint a wee bit. The length is shorter than I am accustomed to wearing, but it's not bad. It will do for a summer, runaround dress, with a nice pair of sandals.

As I finished typing this, I am looking out my window and it's now raining. I might have to change into something warmer for tonight. I have a meeting to attend and I don't want to freeze.

Monday, May 18, 2009

WIFD Day 2


Today, we awoke to snow on the ground and temperatures that had fallen, quite a bit, from yesterday's warmth. I found myself needing to slip into warmth. Along with warmth given by clothes, I wanted my 'friends' near to me, to warm up my heart and thoughts. I put on the trusty old microfiber tights with a 10 oz denim skirt that I made, years ago, and a peasant blouse that I purchased last fall. I put on my lovely, crocheted shawl, made by a dear friend, my beautiful apron, also made by a dear friend and in my hair, I put in a lovely hair ornament,also, from a dear friend. All these things kept my friends in my thoughts throughout my sewing afternoon.

My husband took the children to a museum, and I was able to stay home and sew. In a quiet house, sewing, uninterrupted, is a rarity in this home. I enjoyed my time sewing, which also gave me time to pray for family and friends. If all goes well, perhaps I can share my sewing projects, later in the week.

I hope everyone out there is staying warm.